Tuesday, September 29, 2015

Integrating CentOS 7 with Windows Active Directory using Samba and Winbind


We'll integrate CentOS 7 (File Server) with Windows Active Directory using winbind + Samba

Domain: SA
AD FQDN: sa.local
DC FQDN: dc2.sa.local
CentOS 7 FQDN: centos7.sa.local

Start off with a CentOS 7 minimal install. I used VM Workstation 10.
Configure a hostname "centos7.sa.local" and set a static IP address.
Be sure /etc/resolv.conf points to the AD as the nameserver.
Copy and paste below commands in CentOS 7 using root login.


# Centos 7.x fileserver with AD authentication of users :: revision 5/1/2015
#
#—— turn off the firewall
systemctl stop  filewalld.service
systemctl disable firewalld.service
#—— check selinux status and turn off as necessary
sestatus

# vi /etc/selinux/config and change to selinux=disabled
#—— install auxillary packages — these will be useful
yum -y install ntp
yum -y install bind-utils
yum -y install net-tools
#—— verify Centos can resolve the AD server
nslookup dc1.sa.local
#—— verify Centos can reach the AD server
ping dc1.sa.local

#—— setup time syncronization to the AD — set the server pool to include the AD
vi /etc/ntp.conf

# add the AD server to the ntp server pool, e.g., server dc1.sa.local
#—— create the home directory for the domain users — note name capitalization
mkdir /home/SA
chmod 0777 /home/SA
#—— install the necessary packages
yum -y install samba samba-winbind*
yum -y install authconfig-gtk*
#—— verify the time can be pulled from the AD server
net time -S dc1.sa.local
#—— sync the time to the AD server
net time set -S dc1.sa.local
#—— start and enable the services to run at boot time – ntpd, smb, winbind
systemctl start ntpd
systemctl enable ntpd
systemctl start smb
systemctl enable smb
systemctl start winbind
systemctl enable winbind
#—— verify that ntpd, smb, and winbind are indeed enabled to start at boot time
systemctl list-unit-files –type=service | grep enabled
#—— setup winbind authentication
authconfig-tui
#—— configure as shown in the following graphics


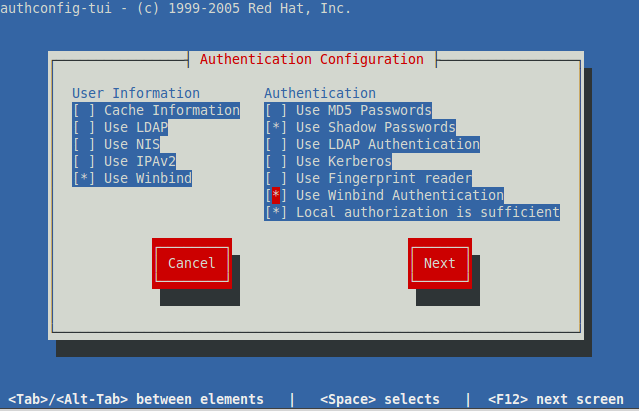
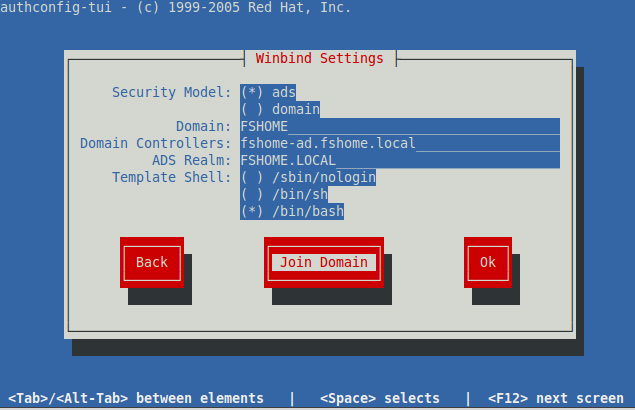
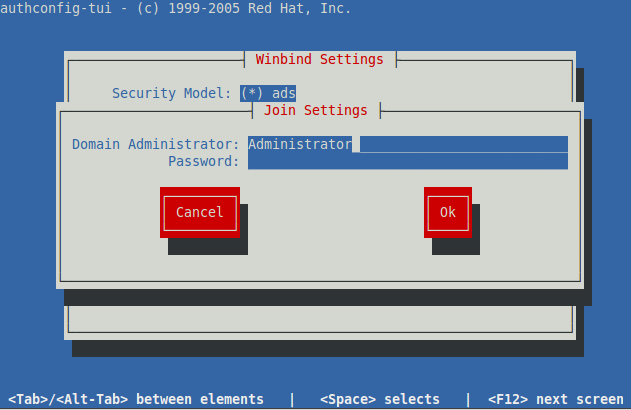
#—— ignore the “No DNS name configured…”  error after entering the password
#—— verify domain join
net ads testjoin
#—— verify AD server info
net ads info
#—— verify users are pulled from AD
wbinfo -u
#—— verify groups are pulled from AD
wbinfo -g
The listing will show the output as DOMAIN/username. Same with the groups. So to fix that
#—— remove the DOMAIN prefixes from the users and the groups
authconfig --enablewinbindusedefaultdomain --update
#—— verify the DOMAIN prefix no longer exist
wbinfo -u
wbinfo -g
###
### on the AD server run the dsquery * command to verify the
### Centos results correspond to AD
### for granularity run the following: dsquery ou, dsquery group, dsquery user
###
#—— allow autocreation of home directories from ssh users login
authconfig --enablemkhomedir --update
#—— allow auto-creation of home directories from Windows clients login by using a script for same
# create script as shown below-
touch /usr/local/sbin/mkhomedir.sh
vi /usr/local/sbin/mkhomedir.sh
——————— script start ———————–
#!/bin/bash
if [ ! -e /home/FSHOME/$1 ]; then
mkdir -m 0700 /home/FSHOME/$1
chown $1:”domain users” /home/FSHOME/$1
fi
exit 0
———————– script end ———————–
#—— set script permission
chmod u=rwsx,g=rwx,o=rwx /usr/local/sbin/mkhomedir.sh
#—— verify the script permissions
ls -l /usr/local/sbin/mkhomedir.sh
Now need to make changes to the default Samba configuration in the [homes] section…
#—— setup smb.conf [homes] section
vi /etc/samba/smb.conf
[homes]
comment = Home Directories

inherit permissions = yes
root preexec = /usr/local/sbin/mkhomedir.sh %U
#—— reboot Centos
sync;reboot
#—— verify configuration still holds after reboot
net ads testjoin
net ads info
wbinfo -u
wbinfo -g

#—— login from a Windows workstation and verify the user’s directory is automatically created, and files can be added and deleted
Go to Run>Type "\\centos7.sa.local\" and hit enter
Put domain user's credentials to login.

#—— Have Fun!
####
### tools/notes for reference
###
#—— dump a list of the autoconfig settings
authconfig –test > authconfig.txt
#—— change the host name
hostnamectl set-hostname centos7.sa.local
#—— if the fileserver hostname is changed, rerun authconfig-tui to rejoin the domain with the new hostname
#—— to restart the network interfaces
systemctl restart network.service
#—— show the IP address on the interface(s)
ifconfig


Ref:
https://theserverplaypen.wordpress.com/2015/05/25/integrating-centos-7-with-active-directory-using-winbind/

Sunday, September 13, 2015

FusionPBX 3.8.4 on CentOS 7

This is the basic setup instructions for installing FusionPBX on a CentOS host.
Details:- 
  • CentOS 6.x (tested 6.6 minimal install)
  • PostgreSQL 9.4
  • Nginx
Requirements
  • Internet connected host 

Step 1: Install a CentOS

Configure a basic host.  Minimum 1GB RAM, 10GB disk, and 2 cores CPU.
CentOS 6.6 minimal 64 bit install.
LVM is not required in a basic install, but advantageous if enough disk.

Step 2: Install script

Copy the install script to the host. install_fusionpbx_postgres_9.4-20150504.sh.txt
 Optional: To populate Freeswitch database:  (Note: Freeswitch database is still not needed as long as Fusionpbx database is operational as this install uses Fusionpbx DB as default for saving all data including CDR)
 After installation, add  following code inside <settings> in  
/usr/local/freeswitch/conf/autoload_configs/switch.conf.xml 
<!-- to use a numeric IP address (no DNS names!): -->
<param name="core-db-dsn" value="pgsql://hostaddr=127.0.0.1 
dbname=freeswitch user=freeswitch password='' options='-c
client_min_messages=NOTICE' application_name='freeswitch'" />
And restart freeswitch
service freeswitch restart

Optional: Using an editor (vi, vim, etc.), edit the script, and update the parameters referring to the company name, hostname, etc.
Sign up to root (sudo su -), and then execute the script.  It's advisable to start a log script, so that any errors can be checked later.  
NOTE: A lot of output is generated, and approximately 1GB of updates is applied to a fresh 6.6 CentOS install.
script fusionpbx.log
chmod uog+rx install_fusionpbx_postgres_9.4-20150504.sh
./install_fusionpbx_postgres_9.4-20150504.sh
Towards the end of the script, you will be prompted several times to accept the certificates being generated.  Simply answer "Y" to each response.
Once the script completes, and returns to a prompt, you can verify that all primary processes are operational by running the following commands:-
service nginx status
service postgresql-9.4 status
service freeswitch status
You should see similar output to the following:-

Step 3: Start browser based config

As per the last statement in the config, launch a browser, and go to the IP address of the host.  (http or https should work.)
Select the database as "postgresql", and enter a username and password that will be used to do the initial configuration of the FusionPBX system.
Click the "Next" button on the right hand side of the screen.

Step 4: Specify the DB

You should be prompted for the details of the database.
Specify the following:-
  • Database Host: localhost
  • Database Port: 5432
  • Database Name: fusionpbx
  • Database Username: fusionpbx
  • Database Password: fusionpbx
  • Create Database Username: <leave blank>
  • Create Database Password: <leave blank>

Click "Install" on the right hand side of the page

Step 5: Login

You will be prompted to log into the system for the first time.
Enter the username and password you selected in step 3 above.

Step 6: Update initial settings

From the menu bar, go to the Advanced menu, and select the Default Settings option.
Scroll down to the following sections, and change/ensure the values as follows:-
  • Server
    • backup = /backup
  • Switch
    • base = /usr/local/freeswitch
    • mod = /usr/local/freeswitch/mod

Step 7: Update System settings

(For FusionPBX version 3.6.3) - To check version, go to Status>System Status
From the System menu, go to the Settings option. 
Modify the Mod Shout Decoder option to be "mpg123".
Click "Save" on the right hand side.

(For FusionPBX version >=3.8.3) 
Go to Advanced menu > Settings option. 
You cannot modify Mod Shout Decoder to "mpg123", instead it has choices "i486, i586, i686,  amd64, generic". 
Don't change anything, leave it as it is. 

Step 8 : Enable xml_cdr module to save Call Detail Records in DB.

(For FusionPBX version 3.6.3)
Go to System menu > Modules option.
Under XML Interfaces, ensure XML CDR module is running.
If not Start it by clicking on "Start" under Action.
(For FusionPBX version >= 3.8.3)
Go to Advanced menu > Modules option.
Same as above.

Configuring Postgresql HA & Replication

We'll use two FusionPBX instances with Postgresql-9.4 DB. One instance will run the primary PostgreSQL-9.4 server and the other instance will run PostgreSQL-9.4 standby server.
For most applications, data is a critical commodity. Storing data in one place is a risky proposition, so you need to have a strategy and a plan in place to ensure that you can recover from a failure as quickly as possible. One way to help prevent data loss is to store the same data on multiple servers and keep those databases synchronized.
PostgreSQL, or Postgres, offers various ways to archive and replicate the primary database for backup, high-availability, and load balancing scenarios. In Hot Standby mode, the system employs two or more servers:
  • primary server runs the active database. This database accepts connections from clients and permits read-write operations.
  • One or more standby servers run a copy of the active database. These databases are configured to accept connections from clients and permit read-only operations. If the primary database server fails, the system can fail over to the standby server, which makes the standby server the active primary server.
The rest of this tutorial will use and discuss a single standby server.

Understanding Hot Standby

Here are some basic points you should understand about how Hot Standby works:
  • Postgres uses write-ahead logging (WAL) to continuously archive database transactions. For each change made to the data files, WAL writes an entry in a log file. The system uses these log entries to perform point-in-time restoration from archives and to keep the standby server up to date. This means that when you set up Hot Standby, you're also setting up archiving.
  • The process of updating the standby server with WAL entries is called streaming replication. This process operates asynchronously, which means it can take some time for the standby server to receive an update from the primary server. Though this delay can be very short, synchronization between the servers is not instantaneous. If your application requires strict consistency between the database instances, you should consider another approach.
  • Postgres doesn't provide software to automatically fail over when the primary server fails. This is a manual operation unless you use a third-party solution to manage failover.
  • Load balancing is not automatic with Hot Standby. If load balancing is a requirement for your appliction, you must provide a load-balancing solution that uses the primary server for read-write operations and the standby server for read-only operations.
Important: This tutorial covers a basic setup of two servers in a Hot Standby configuration. The tutorial doesn't try to cover every configuration that is available to you for this scenario. For a complete understanding of how to optimize Postgres in standby scenarios, refer to the Postgres documentation.

Objectives

  • Set up two FusionPBX instances running Postgresql-9.4. HOWTO: FusionPBX on CentOS
  • Create an extension in default domain in primary FusionPBX/Postgresql server.HOWTO: FusionPBX - Adding Domains / Extensions
  • Configure the primary Postgresql server.
  • Back up the primary Postgresql server to the Postgresql standby server.
  • Configure the Postgresql standby server to run in Hot Standby mode.
  • Start the Postgresql standby server and test if extension created on Primary is replicated on standby server.
Important: Allow port 5432 for any incoming tcp connections in Firewall in Primary Server.

Configuring the primary Postgresql-9.4 server

To configure the primary server, you will:
  • Create a Postgres user for replication activities.
  • Create a directory to store archive files.
  • Edit two configuration files: pg_hba.conf and postgresql.conf.

Create a user for replication

To perform replication, Postgres requires a user, also called a role, with special permissions. On the primary server, run the following command:
createuser -U postgres fusionpbxrep -P -c 5 --replication
This command performs the following actions:
  • sudo -u postgres ensures that the createuser command runs as the user postgres. Otherwise, Postgres will try to run the command by using peer authentication, which means the command will run under your Ubuntu user account. This account probably doesn't have the right privileges to create the new user, which would cause an error.
  • The -U option tells the createuser command to use the user postgres to create the new user.
  • The name of the new user is fusionpbxrep. You'll enter that username in the configuration files.
  • -P prompts you for the new user's password.
  • -c sets a limit for the number of connections for the new user. The value 5 is sufficient for replication purposes.
  • --replication grants the REPLICATION privilege to the user named fusionpbxrep.

Create the archive directory

Create a directory to store archive files. This directory is a subdirectory of the cluster's data directory, which is named data by default. You'll use this path in one of the configuration files. If you have configured your cluster to use a different directory for data, you must create your archive directory in that directory and then change the corresponding configuration setting.
In the SSH terminal for the primary server, enter the following command:
mkdir -p /var/lib/pgsql/9.4/data/primary/archivedir

Edit pg_hba.conf

This configuration file contains the settings for client authentication. You must add an entry for the user repuser to enable replication.
  1. Edit the file. For PostgreSQL version 9.4, you can enter::
    vi /var/lib/pgsql/9.4/data/pg_hba.conf
  2. After the example replication entries, add the following lines. Replace <standby-IP> with the external IP address of the standby server:
    # Allow replication connections
    host     replication     repuser         <standby-IP>/32        md5
    
    
  3. Save and close the file.

Edit postgresql.conf

This configuration file contains the main settings for Postgres. Here, you will modify the file to enable archiving and replication.
Important: Don't forget to uncomment any lines you edit in the configuration files, or your changes won't take effect.
  1. Edit the file. In the terminal for the primary server, enter the following command:
    # nano /var/lib/pgsql/9.4/data/postgresql.conf
  2. In the WRITE AHEAD LOG section, in the Settings section, change the WAL level:
    wal_level = hot_standby
  3. In the Archiving section, change the archive mode:
    archive_mode = on
  4. Change the value for the archive command. This setting tells Postgres to write the archive files to the directory that you created in a previous step:
    archive_command = 'test ! -f /primary/archivedir/%f && cp %p /primary/archivedir/%f'
    
  5. In the REPLICATION section, in the Sending Server(s) section, change the value for the maximum number of WAL sender processes:
    max_wal_senders = 3
    
    For this tutorial, the value of 3 is sufficient to enable backup and replication.
  6. In Listen
    listen_addresses = 'localhost, <Primary-IP>'
  7. Save and close the file.

Restart the primary server

Now that you've made the configuration changes, restart the server to make the changes effective. Enter the following command:
# service postgresql-9.4 restart

Backing up the primary server to the standby server

Before making changes on the standby server, stop the service. In the SSH terminal for the standby server, run the following command:
# service postgresql-9.4 stop
Important: Don't start the service again until all configuration and backup steps are complete. You must bring up the standby server in a state where it is ready to be a backup server. This means that all configuration settings must be in place and the databases must be already synchronized. Otherwise, streaming replication will fail to start.

Run the backup utility

The backup utility, named pg_basebackup, will copy files from the data directory on the primary server to the same directory on the standby server.
  1. The backup utility won't overwrite existing files, so you must rename the data directory on the standby server. Run the following command:
    # mv /var/lib/pgsql/9.4/data /var/lib/pgsql/9.4/data_old
  2. Run the backup utility. Replace <primary-IP> with the external IP address of the primary server.
    # pg_basebackup -h <primary IP> -D /var/lib/pgsql/9.4/data -U fusionpbxrep -v -P --xlog-method=stream
    The backup utility will prompt you for the password for the user named fusionpbxrep.
The backup process should take just a few moments. When it's done, you can move on to configuring the standby server.

Configuring the standby server

To configure the standby server, you'll edit postgresql.conf and create a new configuration file named recovery.conf.

Edit postgresql.conf

For the standby server, you only need to change one setting in this file. Follow these steps:
  1. Edit the file. In the terminal for the standby server, enter the following command:
    # vi /var/lib/pgsql/9.4/data/postgresql.conf
  2. In the REPLICATION section, in the Standby Servers section, turn on Hot Standby and uncomment the line:
    hot_standby = on
  3. Save and close the file.

Create the recovery configuration file

When you implement a server in Hot Standby mode, you must supply a configuration file that contains the settings that will be used in the event of data recovery. This file is named recovery.conf. To add this file to the standby server, follow these steps:
  1. Copy the sample recovery file to the proper location. In the terminal for the standby server, enter the following command:
    # cp -avr /usr/pgsql-9.4/share/recovery.conf.sample /var/lib/pgsql/9.4/data/recovery.conf
  2. Edit the recovery file:
    # vi /var/lib/pgsql/9.4/data/recovery.conf
  3. In the STANDBY SERVER PARAMETERS section, change the standby mode:
    standby_mode = on
  4. Set the connection string to the primary server. Replace <primary-external-IP> with the external IP address of the primary server. Replace <password> with the password for the user named repuser.
    primary_conninfo = 'host=<primary-external-IP> port=5432 user=repuser password=<password>'
    
  5. (Optional) Set the trigger file location:
    trigger_file = '/tmp/postgresql.trigger.5432'
    
    The trigger_file path that you specify is the location where you can add a file when you want the system to fail over to the standby server. The presence of the file "triggers" the failover. Alternatively, you can use the pg_ctl promote command to trigger failover.
  6. Save and close the file.

Start the standby server

You now have everything in place and are ready to bring up the standby server. In the terminal for the standby server, enter the following command:
# service postgresql-9.4 start

Seeing the replication at work

To demonstrate that the replication between the primary and standby servers is working, you can add a row to the guestbook table on the primary server and then query the standby server to see the new row.
Recall that you have already added one row to the table on the primary server. Start by verifying that the standby server has the same information.
  1. On the standby server, start PSQL:
    # psql -U fusionpbx
  2. At the PSQL prompt, enter the following query:
    select * from v_extensions;
    
    You should see that the table contains the single row that you originally added. Now, add a second row on the primary server either from fusionpbx web console (e.g. adding a new extension)
  3. On the primary server, start PSQL:
    # psql -U fusionpbx

  4. Switch back to the standby server terminal and repeat the query for all rows of the guestbook:
    select * from v_extensions;
    
    You should now see that the standby server has received the update from the primary server.
  5. To exit PSQL, enter \q.
  6. To exit the root shells, enter exit in each terminal window.