Sunday, February 24, 2019

Ransomwares - Trojan to Cryptolocker


History of Ransomwares

Ransomware attacks started decades back, with the first one released in 1989. It was called AIDS Trojan, which infected systems via 5 and 1/4 inch floppy. AIDS Trojan had similar characteristics that of today's  ransomwares where it encrypted files and asked the victim for ransom to provide key for decryption. Back in those days, though security was weak, the ransomware was not robust enough to gain traction.

After the first one in 1989, there weren't any ransomware attacks recorded until the mid-2000s, when attacks began using stronger encryption algorithm like RSA which were difficult to decrypt, the popular one being Trojan.Gpcoder family seen around 2005. Gpcoder was the first kind of 'crypto-ransomware' followed by TROJ.RANSOM.A, Archiveus, Krotten, Cryzip, and MayArchive.

In 2011, another variant of ransomware appeared, a first kind of "locker-ransomware". It was called Trojan.Winlock which instead of encrypting files displays a fake windows activation page which will go away only when victim input windows activation code upon calling costly international premium number.

Cryptolocker was the most threatening crypto-ransomware variant appeared in 2013 which alone infected more than 250,000 systems and generated more than $3 million before the Gameover Zeus Botnet, the backbone of Cryptolocker, was taken down in 2014.

During 2014 - 2015, the most prominent ransomwares were CryptoWall, Cryakl, Scatter, Mor, CTB-Locker, TorrentLocker, Fury, Lortok, Aura, and Shade, the most revenue generating one being CryptoWall, Cryakl and Scatter which accounted for 71% of attacks during 2014 - 2015. According to Kaspersky's research in 2015- 2016, TeslaCrypt, a form of crypto-variant, accounted for 50% of attacks during 2015-16.

Influence of Cryptocurrency

Cryptocurrency is an intangible digital currency which exists only in internet backed by a decentralized system (crypto algorithm), and was originally created (Bitcoin born in Oct 2008) to bypass the current government controlled centralized monetary system.

With the advent of Bitcoin, the first cryptocurrency, it became easier for the attacker to be anonymous when a ransom is paid. The cryptocurrency uses an unique software/algorithm which hides identity of sender and recipient favouring anonymous transactions over the internet. Anyone could easily get a bitcoin address and send/recieve payment a bitcoin address without being traced. Cryptolocker was the first kind of crypto-ransomware which started demanding Bitcoins as ransom in 2013.

Over the years 2014 - 2016, various cryptolocker variants - Cryptowall, TorrentLocker, TeslaCrypt emerged targeting primarily high valued organisations - hospitals, banking and government sectors. All of them had one thing in common: ransom demands by Bitcoin.

In 2015, Armada group launched the largest crypto attack in the history targeting banking industry, a series of crypto attack on Greek Banks, demanding over $7 million from each bank. However, the banks were able to increase their security and get away from it without paying a penny.

In early 2016, hospitals in US like Los Angeles hospital, Hollywood Presbyterian Medical Center (HPMC), Ottawa Hospital, Kentucky Methodist Hospital, Chino Valley Medical Center, Desert Valley Hospital in California were hit by cryptolocker-variant ransomwares, one of them named "locky",which cost HPMC $17k, though rest of the others get away without paying.

In March 2016, petya, a unique cryptolocker-variant ransomware hit many businesses around the world. Apart from usual cryptolocker-variants, it encrypts a computer’s master file table and replaces the master boot record with a ransom note, rendering the computer unusable unless the ransom is paid. Petya was also the first of the kind to be offered as ransomware-as-a-service by its creators, followed by Cerber.

KeRanger, one of the first ransomware created in 2016 to target Apple OS X, hit around 6500 machines but couldn't do significant financial damage.

In 2017, Wannacry, a cryptolocker-variant ransomware hit the thousands of machines around the world. It was the first of the kind which could propagate quickly over the network. One of the target was Victoria where 55 speed cameras were taken down. The damage couldn't multiply as an english guy named Marcus Hutchins found the "kill-switch" for the ransomware and stopped it.

In Aug 2018, Ryuk, the first kind of cryptolocker-variant which had ability to identify and encrypt network drives and resources, as well as delete shadow copies on the endpoint, hit the world costing victims around $600k. Using Ryuk, the attackers could disable the Windows System Restore option for users, and therefore make it impossible to recover from the attack without external backups.

How to protect against ransomware attacks

As the technology evolves, different variant of cryptolocker ransomwares will be seen in coming years. The only way to fight them back is at the least you do regular offsite backup of your systems.

Below are the things you can do to protect against these attacks:

1. Implement 3-2-1 backup rule.

3-2-1 Backup Rule:

The most accepted rule for backup best practices is the three-two-one rule. It can be summarized as: if you’re backing something up, you should have:
At least three copies,
In two different formats,
with one of those copies off-site (Disaster Recovery - DR Site)

Let’s go through each of those rules. They’re all based on one concept, really: redundancy. Each of those rules is meant to make sure that your data is stored in multiple ways, so that at least one backup will survive.

Three different copies means three different copies in different places. (Different folders on the same hard drive or flash disk does not count.) Why three? In the digital era, it is very easy to make digital copies, and it’s better to have more copies than too few. By keeping them on different places, it reduces the risk of a single event destroying multiple copies.

Now, why two different formats? What this means is that you must use at least two different methods to store your data. For example, burning your photos to a DVD from your PC’s hard drive counts (hard disk and DVD). However, copying them to an external disk does not (as they’re both hard disks.) If you do both, then you satisfy this rule (and the first one as well). Again, using different formats reduce the risks that all your backups will be damaged, as different formats have different strengths and weaknesses when it comes to redundancy.

Keeping one copy off-site ensures that even if something happens to where your data is – like a fire, or a break-in – at least one copy is safe somewhere else. If something does go wrong where you are, at least your data will be safe.

Having said that, the backup should be tested in regular basis for its validity.

2. Implement regular patch policy:
Most of the softwares including OS vendors release patches frequently. The security patches are the critical ones that need to be applied ASAP to make the software more secure against known threats. Every company should designate a team for patching softwares.

3. Proper Anti-malware and mail filtering system: 
Most of the ransomwares attacks (more than 70%) were in the form of phishing emails containing malicious URLs or attachments. Having updated anti-malware and mail filtering system is a must for any company. Also frequently organising training to non-technical staffs on how to detect suspicious websites/emails is proven to be helpful in decreasing the successful attacks.

4. Sensible Restrictions: 
Certain limitations should be placed on employees and contractors who:
- Work with devices that contain company files, records and/or programs
- Use devices attached to company networks that could be made vulnerable
- Are third-party or temporary workers

5. Proper Credential Tracking: 
Any employee, contractor, and person who is given access to systems create a potential vulnerability point for ransomware. Turnover, failure to update passwords, and improper restrictions can make result in even higher probabilities of attack at these points.


Sources:
https://digitalguardian.com
https://blog.trendmicro.com
https://medium.com
https://www.theguardian.com
https://blog.malwarebytes.com

Tuesday, July 3, 2018

My IT Automation Dream


IT Automation Dream

Part I - My University days

I have been IT automation enthusiast and a computer geek since my days in Uni. I used to think about ways to automate any practical task assigned to me in the classes. Be it to solve a simple mathematical task to complex Graph Theory problem, I used to spend more time on designing logic to automate it and then formulating it using one of the programming languages I learned. From DIY hardware projects to designing a Network ATM Switch, I enjoyed most of my time in university in automating things that I was interested in and I was assigned to do as part of my degree.

I remember the days when I used to spend the most of my leisure time in the computer lab learning new programming logics. The first high level language I learned in the 1st semester was C which got me pretty excited about pursuing my interest in automation. I was so much fascinated by the fact that that with the power of C language, you can even build an Operating System (example Microsoft Windows, Red Hat Linux). My first dream project was to build a chess software in C which I couldn’t complete but learned a lot about automation and sort of AI involved in it. But, I continued my dream to automate things using C language to build my first successful software graphical game called “Breakout” or “Beatball” where you have a horizontal bar to move from one end to another on the screen to avoid the bouncing ball hitting the bottom of the screen. I absolutely enjoyed creating and playing the game. The next project was a little bit different as it was a hardware automation project but using C language. I was so much into this project that I sacrificed couple of nights just to understand the logic behind register, capacitor, diodes and relay switches which were the major components in the project. 

With little practical knowledge from the electronics lab in Uni, I started to put together the knowledge I gained into this project. Since the project required a special chip which was not available in Uni lab, I had to go to local electronic markets to search for it. I was lucky to find an electronic shop run by a guy who himself was a hardware automation enthusiast. The demo and information he gave me in around half an hour was enough for me to design a prototype for my project. By the way, you would be thinking what was the project? The project was ‘Home Appliances Automation’. To me, at that time, controlling (ON & OFF) home appliances at the click of a button on the keyboard of computer, was an absolute cracker. I got the project finally running after many sleepless days. I remember the day I presented it as my final project in Semester 2, there were two teachers who were doing assessment and rest of my colleagues who were curious to know about my mysterious project. Nobody expected that I was doing a hardware project using C because every one of my colleague was into software project. For me, the moment was a bit daunting and my heart was pounding thinking what if the hardware fails to work. Alright, it was now time to show, I powered on my circuit board and connected it to the parallel port on the back of CPU of computer. I had two 100W light bulbs connected to the circuit board to demonstrate the working of project. I opened the C program and executed it to bring the graphical switch (ON & OFF) and at that point, everybody was staring at the bulbs. I clicked on switch ON button in the screen, and magically the bulbs glowed. As it happened, there was a huge around of applause and it was the most satisfying moment of my life. I felt as if I conquered the world. That moment, I decided I want to do something in IT automation. It is automation that makes me happy and satisfied.

With the dream to automate even more, I played with more computer languages and hardware to build my DIY seven segment counter, score board and a digital clock. In my final year project, in coordination with my colleagues, I designed a hardware ATM Network Switch that can process ATM packets. My team got the best compliments and marks from the assessors. These automation projects gave me so much pleasure in my life. In other way, I lived the dream of my life.

To be continued in Part 2...


Tuesday, May 23, 2017

WannaCry and EternalRocks Ransomware - Are you safe?

Last week “WannaCry” made headlines worldwide, and this week “EternalRocks” is all over the place. Ransomware like WannaCry and EternalRocks has gained its momentum lately in cyber-attack vector panicking millions of machines. WannaCry which was built from two of seven NSA (National Security Agency) tools leaked in 2013 impacted many health organizations in UK and around the globe. Luckily, accidental provision of Kill-Switch by the creator of WannaCry, made it's spread a bit slower where many of you would have benefited the precious time to patch your machines.

But be aware, EternalRocks has potential of causing more damage than WannaCry as EternalRocks leverages seven NSA SMB Exploit tools over two used by WannaCry. And, keep in mind, it doesn't have Kill-Switch which will make the exploit even worse. EternalRocks can literally outbreak anytime causing havoc in the digital world.

The only preventive measure you would think of against these ransomwares is to patch, patch and patch your systems (firewalls, windows machines) regularly and as soon as it's release. Now that you have patched against WannaCry and EternalRocks, wooooo! Great Job!, still wondering whether your RMM tool did patch your systems correctly or not, or you want to be 100% sure that your systems are correctly patched? Then i have answer to your question.

I have compiled few scripts from internet into one to help you in finding out whether your system is correctly patched or not against WannaCry and EternalRocks. Below is vbscript you are welcomed to copy and use. It is tested in Windows 7/Win2008 and above and doesn't not work in WinXP/Win2003.
https://pastebin.com/GM7TgTTHTo run it, copy and paste into notepad or notepad++ and save it as "patchdetect.vbs" and double click it.

WinXP or WinServer2003?

Should you need to find out in WinXP or Windows Server 2003, you'll have to get your hand dirty.
Bring up your command line in XP or 2003 machine by executing cmd.exe as Administrator.
Type below:wmic qfe get hotfixid | find "KB4012598"

Output:
KB4012598 
#If you see this output, you are patched.

As of today, KB4012598 is the patch released by Microsoft for Windows XP or Server 2003. If you come across other patch, you can simply replace KB#number in command above to check.

It’s never too late to patch rather than having pain to loose million dollar worth data.

Good luck patching!


Thursday, April 20, 2017

GIT - Source Control System in Action!

       If you are wondering how to get GIT Source or Version Control System working within minutes, you have landed to the right page. We'll go step by step on how to get GITlab appliance from Turnkey UP and running in your local environment with GIT over HTTP enabled. You'll also learn how to create new projects, add existing projects and keep track of your projects.

Requirements:
- TurnKey GITLab appliance
- VMWare/Virtual Box Client Setup in your local machine
- CentOS 7 VM as GIT client.

Lets start.
  • Download Turnkey Gitlab OVA file from https://www.turnkeylinux.org/gitlab  and run it with VMWare workstation or vSpher
  •  Increase memory of the appliance to at least 2GB and restart.
  •  As the prompt asks, set your email id (user login for git HTTP), password, root password, mysql root password etc.
  •             You can ignore default backup scheme of Turnkey.
      Screen will provide you with login URLs:

    ·         Go to web to access GIT HTTP.
    ·         Add new project


    By default there will be only one group “Administrator” where you can create first project.
    If you want to create different group, go to Groups on left menu and create another one.


    ·         Create SSH Key for access from local machine to GIT Server
    a.       To generate a new SSH key pair, use the following command:
    Git Bash on Windows / GNU/Linux / macOS:
    ssh-keygen -t rsa -C "your.email@example.com" -b 4096
    Windows:
    Alternatively on Windows you can download PuttyGen and follow this documentation article to generate a SSH key pair.
    b.      Next, you will be prompted to input a file path to save your SSH key pair to.
  • If you don't already have an SSH key pair use the suggested path by pressing enter. Using the suggested path will normally allow your SSH client to automatically use the SSH key pair with no additional configuration.
    If you already have a SSH key pair with the suggested file path, you will need to input a new file path and declare what host this SSH key pair will be used for in your .ssh/config file, see Working with non-default SSH key pair paths for more information.
    a.       Once you have input a file path you will be prompted to input a password to secure your SSH key pair. It is a best practice to use a password for an SSH key pair, but it is not required and you can skip creating a password by pressing enter.
    Note: If you want to change the password of your SSH key pair, you can use ssh-keygen -p <keyname>.
    b.      The next step is to copy the public SSH key as we will need it afterwards.
    To copy your public SSH key to the clipboard, use the appropriate code below:
    macOS:
    pbcopy < ~/.ssh/id_rsa.pub
    GNU/Linux (requires the xclip package):
    xclip -sel clip < ~/.ssh/id_rsa.pub
    Windows Command Line:
    type %userprofile%\.ssh\id_rsa.pub | clip
    Git Bash on Windows / Windows PowerShell:
    cat ~/.ssh/id_rsa.pub | clip
    c.       The final step is to add your public SSH key to GitLab.
    Navigate to the 'SSH Keys' tab in your 'Profile Settings'. Paste your key in the 'Key' section and give it a relevant 'Title'. Use an identifiable title like 'Work Laptop - Windows 7' or 'Home MacBook Pro 15'.
    If you manually copied your public SSH key make sure you copied the entire key starting with ssh-rsa and ending with your email.


    ·        
    Set GIT global user in local machine as yourself (set your email exactly same as with GIT Profile)#git config --global user.name “Sam”#git config --global user.email sam@xyz.com
·         GIT Clone the repository created to your local machine.
#cd /root/
#git clone git@<GIT-Server-IP>:gitlab-admin/virtualhost-test1.git
·         Add a new file to GIT repo.
#cd test1
#ls –al   #check for .git folder
#touch newfile1
#git add newfile1
#git push –u origin master 
·         Add existing directory/project to GIT repo.
Create a new project in GIT “newproject-test1”
In your local machine, do following:
#cd existingdir1
#git init       //initialize existing project as GIT project
#git add .    //add everything under the project directory to GIT ready to be committed
#git commit –m “Commit new project for push to GIT server”

//add remote GIT server as default ready to push changes to Master
#git remote add origin git@<GIT-Server-IP>:gitlab-admin/newproject-test1.git
//verify connectivity to remote GIT project
#git remote –v  
//push changes to GIT Server Master project
#git push –u origin master

Wednesday, November 30, 2016

Recover Webmin's root pasword


There are cases where you don't have root password and can't login to webmin. Like the one i came across AWS RedHat 7 instance recently, AWS doesn't provide you root password for security reason. And you need admin login for webmin.

Also, in Ubuntu by default, root password is disabled, and you won't be able to log in to the Webmin webpage, as the Webmin root login will be disabled too. To fix this, you need to manually change the Webmin root password.

You can do this in one of two ways:

Procedure 1

After you perform # apt-get install webmin or yum install webmin ,you have to do the following:

Find your webmin binary install directory and webmin configuration directory.
If you don't know where it is, you can find it by running:
$ locate changepass.pl or $ sudo find / -name changepass.pl
$ #and
$ locate miniserv.conf

Then follow these instructions to change the password. Change your working path to the webmin binary install directory and then run changepass.pl:
$ cd <webmin-install-dir>
$ sudo ./changepass.pl <webmin-config-dir> root <newpassword>
Note this ONLY changes the webmin root login password and does not change the your 'real' root password.

Procedure 2

Get your encrypted password from /etc/shadow.

For example, the following command will output the password to the screen:
$
sudo grep your_username /etc/shadow |cut -f2 -d:

Next we edit this file:
$sudo vi /etc/webmin/miniserv.users
Note: you will need superuser rights to save it
Replace the asterisk in the first line with the password you aquired from /etc/shadow, so that the line looks something like this: 

root:$1$e/9mjoasd$asdasljjwynSD42

Save the file and exit the editor after that.

Restart webmin with this command:

$sudo /etc/init.d/webmin restart
After that, you can go to https://localhost:10000/ in your web browser and login using root as the username and the password of your non-root user.

Ref: https://help.ubuntu.com/community/WebminWithoutARootAccount

Tuesday, November 29, 2016

Apache Tomcat 8 Installation and Configuration in CentOS 6.8


I had to work recently on a project where i got to install Java 1.8 and Apache Tomcat 8 in CentOS 6.8 x64 bit. Below are step by step instructions for full configuration of Apache Tomcat and adding it as init.d service. Hope you enjoy this tutorial.

1.Install Java 1.8
#cd /opt/
#wget --no-cookies --no-check-certificate --header "Cookie: gpw_e24=http%3A%2F%2Fwww.oracle.com%2F; oraclelicense=accept-securebackup-cookie" "http://download.oracle.com/otn-pub/java/jdk/8u111-b14/jdk-8u111-linux-x64.tar.gz"
#tar xzf jdk-8u111-linux-x64.tar.gz
# cd /opt/jdk1.8.0_111/
# alternatives --install /usr/bin/java java /opt/jdk1.8.0_111/bin/java 2
# alternatives --config java
This will display programs which provide 'java'. Below is example:
  Selection    Command
-----------------------------------------------
*  1           /opt/jdk1.7.0_71/bin/java
 + 2           /opt/jdk1.8.0_45/bin/java
    3           /opt/jdk1.8.0_91/bin/java
    4           /opt/jdk1.8.0_111/bin/java
Enter to keep the current selection[+], or type selection number: 4

# alternatives --install /usr/bin/jar jar /opt/jdk1.8.0_111/bin/jar 2
# alternatives --install /usr/bin/javac javac /opt/jdk1.8.0_111/bin/javac 2
# alternatives --set jar /opt/jdk1.8.0_111/bin/jar
# alternatives --set javac /opt/jdk1.8.0_111/bin/javac

Verify java version
[root@centos]# java -version
java version "1.8.0_111"
Java(TM) SE Runtime Environment (build 1.8.0_111-b14)
Java HotSpot(TM) 64-Bit Server VM (build 25.111-b14, mixed mode)


Configuring Environment Variables
Most of Java based application’s uses environment variables to work. Set the Java environment variables using following commands
•Setup JAVA_HOME Variable
# export JAVA_HOME=/opt/jdk1.8.0_111
•Setup JRE_HOME Variable
# export JRE_HOME=/opt/jdk1.8.0_111/jre
•Setup PATH Variable
# export PATH=$PATH:/opt/jdk1.8.0_111/bin:/opt/jdk1.8.0_111/jre/bin
#vi /etc/environment
JAVA_HOME=/opt/jdk1.8.0_111|
JRE_HOME=/opt/jdk1.8.0_111/jre
PATH=$PATH:/usr/local/sbin:/usr/local/bin:/sbin:/bin:/usr/sbin:/usr/bin:/root/bin:/opt/jdk1.8.0_111/bin:/opt/jdk1.8.0_111/jre/bin


2. Tomcat 8 Intallation:
#cd /tmp
#wget http://mirror.ventraip.net.au/apache/tomcat/tomcat-8/v8.0.39/bin/apache-tomcat-8.0.39.tar.gz
#tar zxvf apache-tomcat-8.0.39.tar.gz
#ls –l
#mv apache-tomcat-8.0.39 /opt/
#cd /opt/apache-tomcat-8.0.39/bin
#./startup.sh  (to start tomcat 8)
#./shutdown.sh  (to stop tomcat 8)

#netstat -antp | grep 8080
tcp        0      0 :::8080                     :::*                        LISTEN      4180/java

Go to browser and type:
http://localhost:8080


You need to setup user login to access “Server status”, “Manager App” and “Host Manager”.
#vi /opt/apache-tomcat-8.0.39/conf/tomcat-users.xml
<user username="tomcat" password="P@ssw0rd" roles="manager-gui,manager-status,manager-script,admin-gui"/>

#cd /opt/apache-tomcat-8.0.39/bin
#./shutdown.sh
#./startup.sh

Now you can login with the user above to access.
(Note: you cannot specify “admin” user as it’ll be locked out due to security settings)

Adding tomcat as init.d service (In this case, there is no dedicated ‘tomcat’ user but it’s built under ‘root’)
Here, user ‘tomcatuser’ is allowed to start/stop/restart (in addition to root)

#vi /etc/init.d/tomcat
#!/bin/bash
# description: Tomcat Start Stop Restart
# processname: tomcat
# chkconfig: 234 20 80
TOMCAT_HOME=/opt/apache-tomcat-8.0.39
TOMCAT_USER=tomcatuser
case $1 in
start)
/usr/bin/sudo $TOMCAT_HOME/bin/startup.sh
;;
stop)
/usr/bin/sudo $TOMCAT_HOME/bin/shutdown.sh
;;
restart)
/usr/bin/sudo $TOMCAT_HOME/bin/shutdown.sh
/usr/bin/sudo $TOMCAT_HOME/bin/startup.sh
;;
esac
exit 0

#chmod 755 tomcat
# chkconfig --add tomcat
# chkconfig --level 345 tomcat on
# chkconfig --list tomcat

To start tomcat during boot: add below
#vi /etc/rc.local
/etc/init.d/tomcat start

#service tomcat start/stop/restart

#vi /etc/sudoers
tomcatuser ALL = /sbin/service httpd24-httpd restart, /etc/init.d/httpd24-httpd restart, /bin/cat /var/log/httpd24/access_log, /bin/cat /var/log/httpd24/error_log, /etc/init.d/tomcat start, /etc/init.d/tomcat stop, /etc/init.d/tomcat restart, /bin/sh /opt/apache-tomcat-8.0.39/bin/shutdown.sh, /bin/sh /opt/apache-tomcat-8.0.39/bin/startup.sh

#Start as user ‘tomcatuser’
$sudo /etc/init.d/tomcat start/stop/restart

#Lastly reboot the server and check it’s loading at startup
#netstat –antp | grep 8080

#Also check PATH is loading correctly after restart
#echo $PATH


Sunday, July 10, 2016

Hastebin - Easy way to share your codes, snippets.


A web-based service for storing and sharing text and code snippets can come in handy in many situations. And if you prefer to use an open source solution for that, Hastebin got you covered. Hastebin's web interface is simplicity itself, and it gives you commands to create a new text snippet, save the current snippet, and open existing snippets for editing. By default, Hastebin treats snippets as Markdown-formatted text, but you can use the Just Text command to edit the snippet as plain text. When you save the snippet you can share it by giving other users its URL, and you can post the URL via Twitter.
The Hastebin server software is based on Node.js, and you can easily deploy a self-hosted Hastebin instance on your own server. While you can use the web interface to add and manage snippets, the dedicated Hastebin command-line utility makes it possible to push snippets to the server from the terminal. The utility is written in Ruby, and if you don't feel like fiddling with RubyGem, you can opt for a simple Bash shell one-liner:
haste() { a=$(cat); curl -X POST -s -d "$a" http://hastebin.com/documents | awk -F '"' '{print "http://hastebin.com/"$4}'; }
To use it, run the following command which pushes the contents of the foo.txt file to the Hastebin server:
cat foo.txt | haste

Source: http://www.linux-magazine.com/Online/Blogs/Productivity-Sauce/Hastebin-An-Open-Source-Alternative-to-Pastebin

Thursday, March 24, 2016

DNS SRV Records - Explained

SRV (SeRVice) records allow flexibility and stability to services making use of them. Like a "general use" MX record, the SRV records relate to a particular service of the domain, like FTP or SIP, rather than a specific machine the way A or C-name records do.
Several programs are starting to make use of SRV records for VOIP.
An OnSIP customer would create an SRV record to take the place of the domain.onsip.com address given by default. With an SRV record a user with the SIP address of:
could become just:
assuming that the user can create an SRV record for acme.com.

SIP Hosting SRV Record Format

For OnSIP, when setting up a SRV record, the general settings are:
Service: SIP
Protocol: UDP
Name: acme.com (your domain name goes here)
Priority:
Weight:
Port: 5060
Target: sip.onsip.com
TTL: 1 hour

SIP SRV records in BIND

In BIND, an SRV record would look like this:
_sip._udp.acme.com. 3600 IN SRV 0 0 5060  sip.onsip.com.

Looking up SIP SRV records

To test that the SRV record has been entered correctly you need to run the dig command from a terminal window on a Unix/Linux system (including OS X).
For Windows see the nslookup command.
The following screen shot shows the command: dig _sip._udp.bytetel.com SRV(replace bytetel.com with your domain name but keep everything else there).
If everything has been set up correctly you will get a confirmation answer:
This shows that the SIP SRV record for bytetel.com points to port 5060 at sip.onsip.com.

XMPP SRV Records

You need to add two (2) SRV records to make XMPP work. Note that the protocol is TCP and that the ports are specific to the service.

XMPP SRV records in BIND

In BIND, the records look like:
_xmpp-client._tcp.acme.com. 3600 IN SRV 0 0 5222 xmpp-client.onsip.com.
_xmpp-server._tcp.acme.com. 3600 IN SRV 0 0 5269 xmpp-server.onsip.com.
You can look an example up using dig on junctionnetworks.com
$ dig _xmpp-client._tcp.junctionnetworks.com SRV
$ dig _xmpp-server._tcp.junctionnetworks.com SRV
So...
Service: XMPP-CLIENT
Protocol: TCP
Name: acme.com
Priority: 0
Weight: 0
Port: 5222
Target: xmpp-client.onsip.com
TTL: 1hour
-- and --
Service: XMPP-SERVER
Protocol: TCP
Name: acme.com
Priority: 0
Weight: 0
Port: 5269
Target: xmpp-server.onsip.com
TTL: 1hour
Ref: https://support.onsip.com/hc/en-us/articles/204567144-What-is-an-SRV-record- 

Tuesday, September 29, 2015

Integrating CentOS 7 with Windows Active Directory using Samba and Winbind


We'll integrate CentOS 7 (File Server) with Windows Active Directory using winbind + Samba

Domain: SA
AD FQDN: sa.local
DC FQDN: dc2.sa.local
CentOS 7 FQDN: centos7.sa.local

Start off with a CentOS 7 minimal install. I used VM Workstation 10.
Configure a hostname "centos7.sa.local" and set a static IP address.
Be sure /etc/resolv.conf points to the AD as the nameserver.
Copy and paste below commands in CentOS 7 using root login.


# Centos 7.x fileserver with AD authentication of users :: revision 5/1/2015
#
#—— turn off the firewall
systemctl stop  filewalld.service
systemctl disable firewalld.service
#—— check selinux status and turn off as necessary
sestatus

# vi /etc/selinux/config and change to selinux=disabled
#—— install auxillary packages — these will be useful
yum -y install ntp
yum -y install bind-utils
yum -y install net-tools
#—— verify Centos can resolve the AD server
nslookup dc1.sa.local
#—— verify Centos can reach the AD server
ping dc1.sa.local

#—— setup time syncronization to the AD — set the server pool to include the AD
vi /etc/ntp.conf

# add the AD server to the ntp server pool, e.g., server dc1.sa.local
#—— create the home directory for the domain users — note name capitalization
mkdir /home/SA
chmod 0777 /home/SA
#—— install the necessary packages
yum -y install samba samba-winbind*
yum -y install authconfig-gtk*
#—— verify the time can be pulled from the AD server
net time -S dc1.sa.local
#—— sync the time to the AD server
net time set -S dc1.sa.local
#—— start and enable the services to run at boot time – ntpd, smb, winbind
systemctl start ntpd
systemctl enable ntpd
systemctl start smb
systemctl enable smb
systemctl start winbind
systemctl enable winbind
#—— verify that ntpd, smb, and winbind are indeed enabled to start at boot time
systemctl list-unit-files –type=service | grep enabled
#—— setup winbind authentication
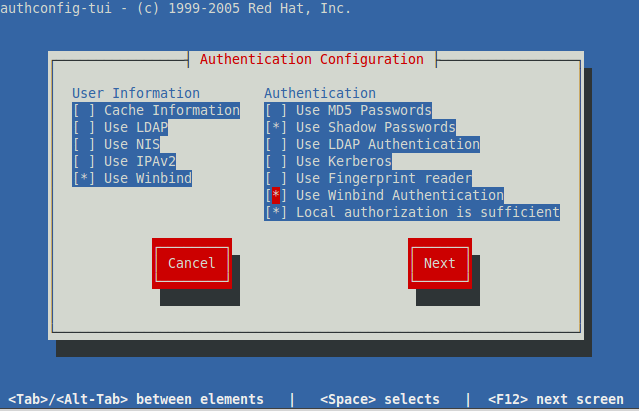
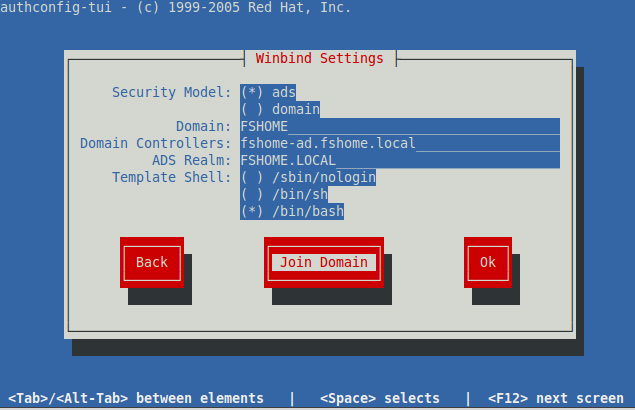
authconfig-tui
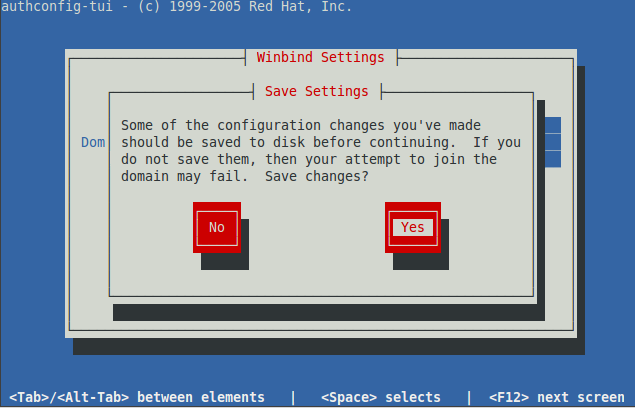
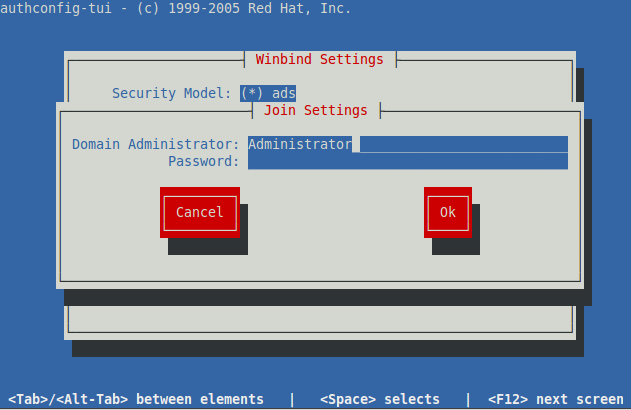
#—— configure as shown in the following graphics


#—— ignore the “No DNS name configured…”  error after entering the password
#—— verify domain join
net ads testjoin
#—— verify AD server info
net ads info
#—— verify users are pulled from AD
wbinfo -u
#—— verify groups are pulled from AD
wbinfo -g
The listing will show the output as DOMAIN/username. Same with the groups. So to fix that
#—— remove the DOMAIN prefixes from the users and the groups
authconfig --enablewinbindusedefaultdomain --update
#—— verify the DOMAIN prefix no longer exist
wbinfo -u
wbinfo -g
###
### on the AD server run the dsquery * command to verify the
### Centos results correspond to AD
### for granularity run the following: dsquery ou, dsquery group, dsquery user
###
#—— allow autocreation of home directories from ssh users login
authconfig --enablemkhomedir --update
#—— allow auto-creation of home directories from Windows clients login by using a script for same
# create script as shown below-
touch /usr/local/sbin/mkhomedir.sh
vi /usr/local/sbin/mkhomedir.sh
——————— script start ———————–
#!/bin/bash
if [ ! -e /home/FSHOME/$1 ]; then
mkdir -m 0700 /home/FSHOME/$1
chown $1:”domain users” /home/FSHOME/$1
fi
exit 0
———————– script end ———————–
#—— set script permission
chmod u=rwsx,g=rwx,o=rwx /usr/local/sbin/mkhomedir.sh
#—— verify the script permissions
ls -l /usr/local/sbin/mkhomedir.sh
Now need to make changes to the default Samba configuration in the [homes] section…
#—— setup smb.conf [homes] section
vi /etc/samba/smb.conf
[homes]
comment = Home Directories
…
inherit permissions = yes
root preexec = /usr/local/sbin/mkhomedir.sh %U
#—— reboot Centos
sync;reboot
#—— verify configuration still holds after reboot
net ads testjoin
net ads info
wbinfo -u
wbinfo -g

#—— login from a Windows workstation and verify the user’s directory is automatically created, and files can be added and deleted
Go to Run>Type "\\centos7.sa.local\" and hit enter
Put domain user's credentials to login.

#—— Have Fun!
####
### tools/notes for reference
###
#—— dump a list of the autoconfig settings
authconfig –test > authconfig.txt
#—— change the host name
hostnamectl set-hostname centos7.sa.local
#—— if the fileserver hostname is changed, rerun authconfig-tui to rejoin the domain with the new hostname
#—— to restart the network interfaces
systemctl restart network.service
#—— show the IP address on the interface(s)
ifconfig


Ref:
https://theserverplaypen.wordpress.com/2015/05/25/integrating-centos-7-with-active-directory-using-winbind/

Sunday, September 13, 2015

FusionPBX 3.8.4 on CentOS 7

This is the basic setup instructions for installing FusionPBX on a CentOS host.
Details:- 
  • CentOS 6.x (tested 6.6 minimal install)
  • PostgreSQL 9.4
  • Nginx
Requirements
  • Internet connected host 

Step 1: Install a CentOS

Configure a basic host.  Minimum 1GB RAM, 10GB disk, and 2 cores CPU.
CentOS 6.6 minimal 64 bit install.
LVM is not required in a basic install, but advantageous if enough disk.

Step 2: Install script

Copy the install script to the host. install_fusionpbx_postgres_9.4-20150504.sh.txt
 Optional: To populate Freeswitch database:  (Note: Freeswitch database is still not needed as long as Fusionpbx database is operational as this install uses Fusionpbx DB as default for saving all data including CDR)
 After installation, add  following code inside <settings> in  
/usr/local/freeswitch/conf/autoload_configs/switch.conf.xml 
<!-- to use a numeric IP address (no DNS names!): -->
<param name="core-db-dsn" value="pgsql://hostaddr=127.0.0.1 
dbname=freeswitch user=freeswitch password='' options='-c
client_min_messages=NOTICE' application_name='freeswitch'" />
And restart freeswitch
service freeswitch restart

Optional: Using an editor (vi, vim, etc.), edit the script, and update the parameters referring to the company name, hostname, etc.
Sign up to root (sudo su -), and then execute the script.  It's advisable to start a log script, so that any errors can be checked later.  
NOTE: A lot of output is generated, and approximately 1GB of updates is applied to a fresh 6.6 CentOS install.
script fusionpbx.log
chmod uog+rx install_fusionpbx_postgres_9.4-20150504.sh
./install_fusionpbx_postgres_9.4-20150504.sh
Towards the end of the script, you will be prompted several times to accept the certificates being generated.  Simply answer "Y" to each response.
Once the script completes, and returns to a prompt, you can verify that all primary processes are operational by running the following commands:-
service nginx status
service postgresql-9.4 status
service freeswitch status
You should see similar output to the following:-

Step 3: Start browser based config

As per the last statement in the config, launch a browser, and go to the IP address of the host.  (http or https should work.)
Select the database as "postgresql", and enter a username and password that will be used to do the initial configuration of the FusionPBX system.
Click the "Next" button on the right hand side of the screen.

Step 4: Specify the DB

You should be prompted for the details of the database.
Specify the following:-
  • Database Host: localhost
  • Database Port: 5432
  • Database Name: fusionpbx
  • Database Username: fusionpbx
  • Database Password: fusionpbx
  • Create Database Username: <leave blank>
  • Create Database Password: <leave blank>

Click "Install" on the right hand side of the page

Step 5: Login

You will be prompted to log into the system for the first time.
Enter the username and password you selected in step 3 above.

Step 6: Update initial settings

From the menu bar, go to the Advanced menu, and select the Default Settings option.
Scroll down to the following sections, and change/ensure the values as follows:-
  • Server
    • backup = /backup
  • Switch
    • base = /usr/local/freeswitch
    • mod = /usr/local/freeswitch/mod

Step 7: Update System settings

(For FusionPBX version 3.6.3) - To check version, go to Status>System Status
From the System menu, go to the Settings option. 
Modify the Mod Shout Decoder option to be "mpg123".
Click "Save" on the right hand side.

(For FusionPBX version >=3.8.3) 
Go to Advanced menu > Settings option. 
You cannot modify Mod Shout Decoder to "mpg123", instead it has choices "i486, i586, i686,  amd64, generic". 
Don't change anything, leave it as it is. 

Step 8 : Enable xml_cdr module to save Call Detail Records in DB.

(For FusionPBX version 3.6.3)
Go to System menu > Modules option.
Under XML Interfaces, ensure XML CDR module is running.
If not Start it by clicking on "Start" under Action.
(For FusionPBX version >= 3.8.3)
Go to Advanced menu > Modules option.
Same as above.